
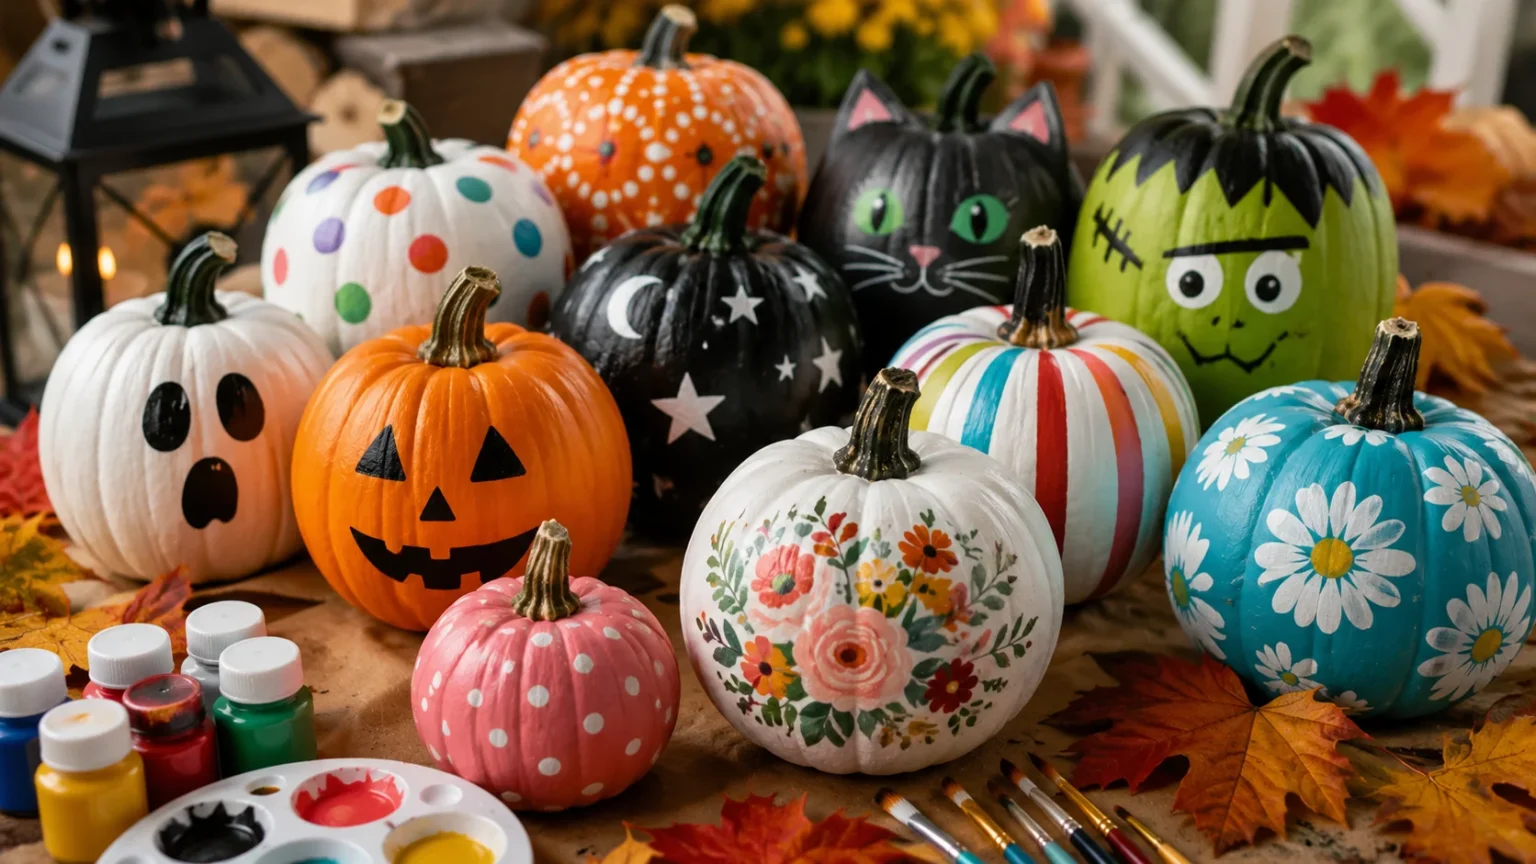

Pumpkin Painting Ideas That Are Easy and Creative
Pumpkin decorating does not always need carving tools, messy seeds, or complicated designs. Painting pumpkins is one of the easiest ways to create festive fall decor while keeping the process simple, flexible, and family-friendly. With the right pumpkin painting ideas, you can transform ordinary pumpkins into colorful centerpieces, porch decorations, party accents, or creative seasonal crafts.
Painting is especially useful for people who want a cleaner alternative to carving. You can work with real pumpkins, mini pumpkins, or reusable craft pumpkins and customize them with colors, patterns, characters, florals, metallic finishes, or minimalist designs. The result can be playful, elegant, spooky, or modern depending on your style and the occasion.
Another reason painted pumpkins are so popular is accessibility. You do not need advanced art skills to create something attractive. Simple dots, stripes, faces, stencils, color blocking, and sponge techniques can produce impressive results with very little preparation. That makes easy pumpkin painting ideas perfect for kids, beginners, classrooms, families, and anyone decorating on a busy schedule.
This guide covers creative pumpkin painting techniques for Halloween, fall decorating, kids’ activities, modern homes, and seasonal parties. You will also find practical tips on choosing paint, preparing the surface, avoiding common mistakes, and helping your finished pumpkin look polished for as long as possible.
Why Paint Pumpkins Instead of Carving Them?
Painting pumpkins is much cleaner than carving. There is no need to cut through thick skin, scoop out seeds, or deal with pumpkin pulp spread across the table. You can simply clean the surface, gather your paint, and begin decorating, which makes the process much easier for quick fall craft sessions.
It can also be safer for children. Pumpkin carving requires sharp tools and close adult supervision, while painting allows younger kids to participate more independently. Washable craft paint, paint pens, stickers, and sponges can turn decorating into an activity the entire family can enjoy together.
Painted pumpkins can also last longer than carved pumpkins because the outer shell remains intact. Once a pumpkin is cut open, moisture loss and exposure to microorganisms speed up deterioration. Keeping the pumpkin whole helps preserve its structure and makes it more practical for longer seasonal displays.
Finally, painting offers much more artistic flexibility. You can create detailed illustrations, simple geometric patterns, cute characters, metallic finishes, seasonal messages, or subtle neutral designs. If you prefer fall decor over traditional Halloween faces, painting gives you far more options than carving alone.
What Paint Works Best on Pumpkins?
Acrylic craft paint is one of the most popular choices for pumpkin decorating because it provides strong color coverage and dries relatively quickly. It also comes in a wide range of shades, making it useful for everything from bold Halloween designs to softer autumn color palettes.
Paint pens are another excellent option, especially for details. They allow you to draw lines, lettering, facial features, dots, and small patterns more precisely than a traditional brush. White, black, gold, and metallic paint pens are particularly useful for decorative pumpkins.
Washable tempera paint can work well for young children, although it may not adhere or last as well as acrylic paint. If the main goal is a fun afternoon activity rather than a long-lasting display, washable paint can make cleanup considerably easier for parents and teachers.
Spray paint is useful for achieving smooth all-over coverage, but it should be used carefully and according to the manufacturer’s safety directions. Outdoor application, proper ventilation, and adequate drying time are important. For simple indoor crafts, brush-on acrylic paint is usually the most convenient option.
How to Prepare a Pumpkin Before Painting
Start by choosing a firm pumpkin without soft spots, deep cuts, or obvious bruising. A healthy surface gives paint a better foundation and helps the finished decoration remain attractive longer. Smooth pumpkins are easier for detailed designs, while textured varieties can create interesting rustic effects.
Wipe the pumpkin with a slightly damp cloth to remove dirt and dust. Then dry it completely before applying paint. Moisture or grime on the shell can make paint slide, bead, or peel rather than adhering evenly to the surface.
Avoid aggressively scrubbing the pumpkin or damaging its skin. The natural outer layer helps protect the fruit, so preparation should focus on gentle cleaning rather than sanding or scraping. If the pumpkin is naturally glossy, thin coats of paint generally work better than one heavy layer.
Set up your work area before starting. Cover the table with paper or a washable cloth and keep brushes, paint, water, paper towels, and decorative supplies within reach. A stable cup, bowl, or ring of cardboard can help keep smaller pumpkins from rolling while you paint.
Easy Pumpkin Painting Ideas for Beginners
One of the simplest beginner designs is a polka-dot pumpkin. Paint the entire pumpkin one color or leave the natural orange background visible, then add dots in contrasting shades. Use the end of a paintbrush, cotton swab, sponge, or round stencil to keep the circles consistent.
Stripes are equally easy and can create a surprisingly polished look. Follow the natural vertical grooves of the pumpkin and paint alternating sections in different colors. Black and white works well for Halloween, while cream, terracotta, mustard, and sage create a softer fall aesthetic.
Color blocking is another beginner-friendly technique. Divide the pumpkin into two or three large sections and paint each one a different shade. You do not need perfect lines; painter’s tape can help create clean borders if you prefer a more structured appearance.
Simple brushstroke designs also work well. Paint loose leaves, short dashes, abstract shapes, or small stars across the pumpkin instead of trying to create one detailed picture. Repetition makes these basic marks look intentional and helps beginners achieve attractive results without needing advanced drawing skills.
Cute Pumpkin Painting Ideas
Cute pumpkin designs often focus on simple faces and friendly characters rather than scary Halloween imagery. Paint a soft background color such as pink, lavender, mint, white, or pale blue, then add closed eyes, rosy cheeks, and a small smile.
Animal faces are another easy option. A white pumpkin can become a bunny with painted eyes and paper ears, while an orange pumpkin can become a fox using white facial patches and pointed ear shapes. Black pumpkins can easily become cats with whiskers and bright eyes.
You can also turn small pumpkins into cheerful food-inspired characters. Paint them to resemble donuts, strawberries, watermelons, ice cream, or candy. These playful designs work particularly well for children’s rooms, fall parties, and classroom decorations.
For an even simpler approach, paint tiny hearts, stars, rainbows, flowers, or smiley faces across the pumpkin. These cute pumpkin painting ideas are easy enough for beginners but still look charming when several pumpkins are displayed together.
Pumpkin Painting Ideas for Kids
Kids usually enjoy projects that allow freedom rather than requiring perfect results. Give them several paint colors, sponge brushes, stickers, and paint pens, then let them create faces, patterns, handprints, or abstract designs according to their own ideas.
Fingerprint art can make the activity especially fun. Children can dip fingertips into washable paint and create small dots that become bugs, flowers, ghosts, or colorful patterns. Once the fingerprints dry, adults or older children can add tiny details using markers or paint pens.
Monster pumpkins are another excellent choice because imperfect shapes actually improve the design. Add mismatched eyes, crooked mouths, colorful teeth, spots, or silly hair. Kids can create completely different monsters without worrying about whether the design looks realistic.
For younger children, consider working with mini pumpkins because they are easier to handle. Set out a few simple examples for inspiration but avoid requiring everyone to copy the same design. The goal should be creative participation rather than producing identical decorations.
No-Carve Pumpkin Painting Ideas
No-carve decorating is ideal when you want festive pumpkins without the mess or short lifespan associated with cutting them open. Paint alone can create detailed designs, but combining paint with other craft materials makes the possibilities even broader.
Try painting a pumpkin white and adding black facial features for a ghost theme. A black pumpkin with metallic stars can create a nighttime look, while a green pumpkin with a silly monster face works well for Halloween without requiring any cutting.
You can also glue lightweight decorations onto a painted surface after the paint has dried. Felt ears, paper crowns, ribbons, faux flowers, pom-poms, and craft eyes can transform simple painted pumpkins into elaborate characters or centerpiece decorations.
These no-carve pumpkin ideas are particularly useful for apartments, classrooms, offices, and homes with young children. You get the visual impact of decorated pumpkins without knives, open flames, or the extra cleanup involved with traditional jack-o’-lanterns.
Simple Halloween Pumpkin Painting Ideas
Black-and-white designs are among the easiest ways to create a strong Halloween look. Paint a pumpkin black and add white ghosts, bats, spiderwebs, stars, or moons. Alternatively, use a white pumpkin as the background and draw the designs in black.
Classic jack-o’-lantern faces can also be painted instead of carved. Use black paint to create triangular eyes, a nose, and a toothy grin on an orange pumpkin. This keeps the traditional Halloween appearance while making the activity much easier.
Spiderweb designs look complicated but are actually simple to create. Draw several lines extending from one point, then connect them with curved horizontal lines. Add a small painted spider nearby to complete the spooky effect.
For something more playful than scary, paint tiny ghosts across the surface. Each ghost can have a slightly different expression, making the pumpkin feel charming rather than frightening. This style works especially well for family-friendly Halloween decorations.
Scary Pumpkin Painting Ideas
If you prefer darker Halloween decor, use black, deep red, gray, and dark green as your main palette. Paint exaggerated eyes, jagged mouths, dripping details, or shadowy shapes across the pumpkin to create a more dramatic appearance.
Skull-inspired pumpkins are particularly striking. Start with a white or cream background, then paint dark eye sockets, a nose cavity, and simple teeth. The design does not need anatomical precision; high contrast is what makes it visually effective.
A cracked or distressed effect can create another spooky look. Paint dark lines branching across a pale surface so the pumpkin appears broken or aged. Add shadow around the cracks to create extra depth.
You can also paint multiple pumpkins as a coordinated horror display. One might feature eyes, another a mouth, and another dark patterns or warning symbols. Grouping several related designs creates more impact than relying on one heavily decorated pumpkin.
Ghost Pumpkin Painting Ideas
Ghost pumpkins are ideal when you want spooky decor that still feels cute and approachable. Paint the entire pumpkin white and add a simple black face with round eyes and an open mouth. The uneven pumpkin shape naturally adds personality to the design.
Another option is painting several small white ghost figures across a black or dark-colored pumpkin. Add different expressions to each ghost so some appear surprised, happy, sleepy, or mischievous. The repetition creates a playful pattern that still fits Halloween.
For minimalist decor, keep the pumpkin’s natural color and paint only one small white ghost on the front. Add tiny stars or a crescent moon around it. This subtle design works particularly well in homes with neutral or modern interiors.
You can also use glow-style paint details for an evening display, provided the product is appropriate for your intended use. Small glowing eyes, stars, or ghost outlines can make the pumpkin more interesting after dark without requiring carved openings or candles.
Black and White Pumpkin Painting Ideas
Black and white pumpkins work well because the color combination is dramatic yet easy to coordinate with almost any Halloween decor. Paint alternating grooves black and white for a striped design that follows the pumpkin’s natural shape.
Checkerboard patterns are another bold option. Lightly sketch the grid first, then fill alternating squares with black paint. The lines do not need to be perfectly mathematical; slightly irregular squares can create a handmade, playful effect.
For something softer, paint a white pumpkin with small black botanical illustrations, dots, stars, or leaves. This makes the pumpkin suitable for both Halloween and general autumn decorating, extending the amount of time you can display it.
Typography also looks effective in monochrome. Paint a pumpkin matte black and add a single white word, short phrase, initial, or seasonal message. Keep the lettering large and simple so it remains readable from across the room.
Pink Pumpkin Painting Ideas
Pink pumpkins offer a cheerful alternative to traditional orange and black decorations. Soft blush shades can fit modern, feminine, romantic, or whimsical decor, while bright hot pink creates a much bolder Halloween statement.
Pair pink with gold for an elegant finish. Paint the pumpkin pale pink, then add metallic gold leaves, dots, stripes, or abstract brushstrokes. This combination works particularly well for fall tables, parties, and decorative displays that need to feel festive without looking spooky.
Pink and black creates a more Halloween-focused style. Paint black bats, spiders, stars, or jack-o’-lantern faces over a pink background. The contrast feels playful and modern while still connecting clearly to the season.
You can also combine several shades of pink across multiple pumpkins. Arrange pale pink, dusty rose, coral, and deep berry pumpkins together for a coordinated display. Adding a few natural white or orange pumpkins can keep the arrangement from feeling overly uniform.
Floral Pumpkin Painting Ideas
Floral pumpkins are ideal for people who want fall decor that feels elegant rather than Halloween-focused. Start with a neutral base such as white, cream, blush, sage, or pale blue, then paint flowers around the center or near the stem.
Simple daisies are especially beginner-friendly. Paint small circles for the centers and add short petals around each one. Scatter several flowers across the surface rather than trying to create one large, complicated arrangement.
For a more autumnal look, paint sunflowers, leaves, berries, and small branches using mustard, rust, burgundy, olive, and brown. These colors connect naturally with fall while creating a decorative design that can remain on display beyond Halloween.
Watercolor-style flowers can also look beautiful. Use thin layers of acrylic paint and loose brushstrokes rather than outlining every petal. The slightly imperfect appearance gives the pumpkin a hand-painted, artistic quality.
Modern Pumpkin Painting Ideas
Modern pumpkin decor often relies on clean shapes, neutral colors, and minimal patterns. Paint pumpkins in shades such as matte white, beige, charcoal, sage, terracotta, or warm gray, then keep the decorative elements simple.
Abstract lines are particularly effective. Use black or dark brown paint to create arches, curved lines, faces, or organic shapes across a neutral background. These designs can blend naturally with contemporary interior decor.
Geometric patterns also work well. Try triangles, half-circles, grids, or asymmetrical color blocks. Painter’s tape can help produce crisp edges, although freehand shapes can create a more relaxed handmade appearance.
A group of modern painted pumpkins often looks better than one isolated design. Choose three or four complementary colors and vary the patterns across several sizes. The repeated palette ties everything together even when every pumpkin has a different design.
Minimalist Pumpkin Painting Ideas
Minimalist designs prove that you do not need to cover the entire pumpkin with paint. Sometimes one small detail is enough to make a natural pumpkin look intentionally decorated.
Try painting a single black heart, crescent moon, star, or simple face on the front. Keeping most of the natural pumpkin visible creates contrast and makes the small painted element stand out more.
Thin line drawings are another excellent minimalist option. Use a paint pen to draw a leaf, flower, abstract face, or simple botanical branch. White pumpkins work especially well for this technique because they resemble a clean drawing surface.
For a monochromatic display, paint each pumpkin one solid muted color and leave it otherwise undecorated. A collection of matte cream, sage, rust, and charcoal pumpkins can look sophisticated even without patterns or lettering.
Metallic Pumpkin Painting Ideas
Metallic paint adds instant drama and works particularly well for table centerpieces and evening displays. Gold, copper, bronze, and silver can all complement the natural texture of pumpkins while creating a polished finish.
Instead of painting the entire surface, try highlighting only the stem and several grooves. A natural orange or white pumpkin with metallic accents feels seasonal without becoming overly shiny.
Metallic splatter is another easy technique. Dip a stiff brush into paint and lightly flick small droplets across a solid-color pumpkin. Protect surrounding surfaces carefully because splatter paint can travel farther than expected.
Gold leaf effects can also be created using metallic paint and irregular brushstrokes. Concentrate the color near the stem or around one side rather than trying to achieve perfect coverage. The uneven finish can make the pumpkin look more artistic and luxurious.
Glitter Pumpkin Painting Ideas
Glitter can create a festive finish, but it works best when used selectively. Painting the stem with adhesive and adding glitter is an easy way to introduce sparkle without covering the entire pumpkin.
You can also paint stripes or dots, allow them to become tacky, and then sprinkle glitter over those specific areas. This produces cleaner designs and reduces the amount of loose glitter around your home.
For children, glitter glue may be easier to control than dry loose glitter. Kids can draw shapes directly onto a painted pumpkin, and the glitter stays suspended in the adhesive rather than scattering across the work surface.
If you want an elegant rather than playful appearance, choose fine glitter in gold, copper, champagne, or silver. Pair it with white, black, blush, or deep green paint so the sparkle becomes an accent rather than overwhelming the design.
Sponge-Painted Pumpkin Ideas
Sponge painting creates texture without requiring detailed brushwork. Dip a small craft sponge lightly into paint, remove the excess, and dab it across the pumpkin to create soft irregular patterns.
An ombre effect is easy to make using this technique. Start with the darkest shade near the bottom and gradually blend lighter shades toward the top. Keeping the transitions imperfect actually helps the gradient look natural.
You can also use small shaped sponges to stamp stars, circles, leaves, or hearts across the pumpkin. Repeating the same shape creates a consistent pattern quickly, making this technique useful for decorating several pumpkins.
For a weathered finish, apply one base color and gently sponge another shade over the top. Cream over terracotta, white over gray, or gold over black can create depth and make the pumpkin look more textured.
Splatter Paint Pumpkin Ideas
Splatter painting is ideal for anyone who wants an energetic design without worrying about precise lines. Start with a solid-color pumpkin, then use a stiff brush to flick contrasting paint across its surface.
Black-and-white splatter creates a modern look, while orange, purple, green, and black feel more traditionally Halloween-inspired. Metallic splatters can add a sophisticated touch to neutral pumpkins.
You can control the effect by changing the distance between the brush and pumpkin. Holding the brush closer generally creates larger, more concentrated marks, while greater distance produces finer scattered droplets.
Because this technique can be messy, work outside or cover the surrounding area thoroughly. Rotate the pumpkin as you paint so the splatter reaches multiple sides and the finished design feels balanced.
Galaxy Pumpkin Painting Ideas
Galaxy pumpkins are dramatic but surprisingly forgiving because the design relies on blended colors rather than precise shapes. Begin with a dark base such as black, navy, or deep purple.
Use a sponge to dab blue, purple, pink, and white paint across selected areas, blending the colors loosely to resemble clouds of stars and gas. Avoid covering the entire dark background so the lighter areas appear to glow.
Next, add tiny white stars using a fine brush or paint pen. You can also flick diluted white paint across the surface to create many small points of light quickly.
Finish with a few larger stars, crescent moons, or constellations if desired. Because no two galaxies look identical, small mistakes disappear naturally into the overall design, making this a great creative project for beginners.
Disney-Inspired and Character Pumpkin Ideas
Character pumpkins are popular because the basic shape of a pumpkin can easily become a head or face. Start by choosing a character with recognizable colors and simple features rather than attempting an extremely detailed illustration.
Classic cartoon faces can often be created using a solid background, large eyes, and a few signature details. You can also use craft foam or felt for ears, crowns, bows, or accessories after the paint dries.
Superhero, monster, princess, and animated-animal designs work well for children’s parties. Let kids choose their favorite character and simplify the design into two or three main features rather than trying to copy every detail.
When making character-inspired pumpkins for personal crafts, focus on recognizable color combinations and your own hand-painted interpretation. The fun comes from transforming the pumpkin rather than achieving perfect commercial artwork.
Fall Pumpkin Painting Ideas That Aren’t Halloween-Themed
Not every painted pumpkin needs ghosts or spiders. Fall-focused designs can remain on display from early autumn through Thanksgiving, giving you more time to enjoy the finished project.
Paint pumpkins with leaves, acorns, wheat, sunflowers, mushrooms, or woodland patterns. Use warm shades such as rust, mustard, burgundy, olive, cream, and brown to create a seasonal palette.
Plaid designs also work beautifully for autumn. Paint intersecting vertical and horizontal stripes in two or three colors. Slightly transparent layers help mimic the overlapping look of real plaid fabric.
For farmhouse-style decor, keep the colors muted and add simple lettering, botanical designs, or distressed brush effects. White and sage pumpkins combined with natural wood, baskets, and dried leaves create an especially cozy display.
Thanksgiving Pumpkin Painting Ideas
Thanksgiving pumpkins can focus on gratitude, harvest imagery, and warm seasonal colors. Paint simple words such as “thankful,” “gather,” or “welcome” across the front of a neutral pumpkin.
Another option is creating a gratitude pumpkin. Leave most of the surface natural and write one thing you are thankful for each day using a paint pen or permanent marker until the pumpkin is covered with meaningful notes.
Leaf garlands painted around the middle also work well. Use different shades of orange, red, gold, brown, and green so the design resembles autumn foliage.
For a Thanksgiving table centerpiece, combine painted pumpkins with candles, greenery, pinecones, dried flowers, and seasonal fruit. Keep the pumpkin designs relatively simple so they complement the food and tableware instead of competing with them.
Mini Pumpkin Painting Ideas
Mini pumpkins are perfect for quick crafts because their small size allows you to complete several designs in one session. They also work well for place settings, shelves, office desks, and small apartments.
Paint each mini pumpkin a different solid color and group them together. A coordinated palette can create more visual impact than trying to add complicated details to such a small surface.
Faces are another easy option. Add tiny eyes, smiles, mustaches, glasses, or monster expressions using a paint pen. Because the pumpkins are small, a few lines are enough to create personality.
Mini pumpkins can also become name cards for a dinner or party. Paint them in neutral colors, then write each guest’s name across the front. Guests can take their pumpkin home afterward as a small seasonal favor.
Pumpkin Painting Ideas for Adults
Adult pumpkin painting can lean toward more detailed, stylish, or decorative techniques. Botanical illustration, modern abstract shapes, metallic accents, and sophisticated color palettes are all popular choices.
Try recreating patterns from your home decor, such as terrazzo, marble, checkerboard, or block printing. Using similar colors helps the pumpkins feel connected to the room rather than looking like temporary party decorations.
Hand-lettering is another attractive option. Paint a dark or neutral background, then use a fine paint pen to add a short seasonal phrase, family name, or welcoming message.
A pumpkin-painting evening can also become a relaxed social activity. Set out brushes, paints, snacks, and several pumpkins, then let everyone create a design at their own pace. Unlike more complicated crafts, painting requires very little instruction.
Pumpkin Painting Ideas for a Fall Party
For a party, choose designs that can be completed reasonably quickly. Guests usually have more fun when they can finish a pumpkin during the event rather than spending hours on complicated details.
Set up separate paint stations with several color palettes and example designs. One area might feature spooky colors, another neutral fall shades, and another bright kid-friendly options.
Provide stencils, stickers, paint pens, and sponge brushes alongside traditional brushes. Different tools help people with varying confidence levels create something they enjoy.
Have a designated drying area so finished pumpkins do not get bumped or smudged. You can also create informal categories such as funniest, most creative, cutest, or spookiest pumpkin if the group enjoys friendly competition.
How to Paint a Pumpkin Step by Step
First, select a healthy pumpkin and gently clean its surface. Allow it to dry completely before you begin, because paint adheres much better when the shell is clean and dry.
Second, choose your design and color palette. Sketch complicated patterns lightly if needed, or use painter’s tape and stencils to create guides. Beginners can skip sketching and work directly with simple shapes.
Third, apply paint in thin coats. Allow each layer to dry before adding another or painting over it with details. Thin coats generally produce smoother coverage and reduce dripping.
Finally, add finishing details with smaller brushes or paint pens. Allow the pumpkin to dry thoroughly before moving it into your display. Handle it by the base whenever possible instead of repeatedly grabbing the painted surface.
How to Make Painted Pumpkins Look More Professional
A limited color palette often creates a more polished result than using every paint color available. Choose two to four complementary shades and repeat them throughout the design.
Clean edges also make a major difference. Painter’s tape, stencils, and fine brushes can help keep geometric patterns neat, while paint pens are useful for crisp lettering and small details.
Do not rush drying time. Painting over a damp layer can lift previous paint, muddy colors, and create uneven texture. Completing the project in stages usually produces a better finish.
Finally, consider how the pumpkin will be displayed. A simple design can look sophisticated when grouped with coordinated pumpkins, greenery, candles, baskets, or seasonal fabrics.
Common Pumpkin Painting Mistakes to Avoid
Applying one very thick coat of paint is a common mistake. Thick paint can drip, take longer to dry, and produce uneven coverage. Several thin coats usually create a cleaner finish.
Painting a dirty or damp pumpkin can also cause problems. Dust, natural residue, and moisture interfere with adhesion, making paint more likely to rub or peel away.
Another mistake is choosing a design that is far more complicated than your available time or skill level. A simple pattern completed neatly often looks better than an unfinished detailed illustration.
Finally, avoid handling the pumpkin excessively before the paint has fully dried. Fingerprints and smudges can quickly spoil otherwise clean designs, especially when working with dark or glossy finishes.
How Long Do Painted Pumpkins Last?
How long a painted pumpkin lasts depends primarily on the condition of the pumpkin, storage environment, temperature, and whether its skin has been damaged. Painting does not prevent natural decay indefinitely.
Keeping the pumpkin in a cool, dry location generally helps. Excessive heat and direct sunlight can speed deterioration, while constant moisture can encourage softening and mold.
Inspect pumpkins occasionally and remove any that develop significant soft spots, leaking, or mold. One deteriorating pumpkin placed directly against others can create a mess and affect the display.
Artificial craft pumpkins are the best choice if longevity matters most. Once painted, they can be stored after the season and reused year after year, making detailed designs more worthwhile.
Can You Paint Artificial Pumpkins?
Yes, artificial pumpkins are excellent for painting and are especially useful when you want decorations that can be reused. Foam, plastic, papier-mâché, and other craft pumpkins are available in many sizes and shapes.
Surface preparation depends on the material. Some artificial pumpkins accept acrylic paint directly, while slick plastic surfaces may benefit from a compatible primer. Always follow the product instructions when working with unfamiliar materials.
Reusable pumpkins are also ideal for detailed projects. Because you do not have to worry about natural decay, you can spend more time creating intricate floral patterns, lettering, or themed collections.
After the season, store finished pumpkins carefully so painted surfaces do not rub against one another. Wrapping individual pieces in tissue or soft material can help preserve detailed artwork for future years.
How to Display Painted Pumpkins
Porch steps are one of the most traditional display locations. Arrange pumpkins in groups of different sizes and combine them with lanterns, mums, baskets, hay, or dried leaves for a layered seasonal look.
Indoors, painted pumpkins work well on mantels, shelves, coffee tables, and entryway consoles. Smaller pumpkins are especially useful because they can fit into existing decor without overwhelming the room.
A dining-table centerpiece can combine several mini pumpkins with greenery or dried flowers. Keep the arrangement low enough that guests can comfortably see one another across the table.
For a modern look, group pumpkins by color rather than design. Several different patterns painted in the same cream, black, rust, and sage palette will feel intentional even when every pumpkin is unique.
Final Thoughts
The best pumpkin painting ideas are not necessarily the most complicated ones. A few clean stripes, cute faces, simple flowers, or bold color blocks can completely transform a pumpkin without requiring advanced artistic skills.
Painting also gives you the freedom to decorate for many different styles. You can create spooky Halloween pumpkins, cheerful children’s designs, elegant metallic centerpieces, minimalist fall decor, or Thanksgiving decorations using the same basic technique.
Start with a design that matches your confidence level and available time. Once you become comfortable with acrylic paint, paint pens, stencils, and simple patterns, you can experiment with more detailed techniques such as galaxy effects, florals, and abstract designs.
Most importantly, treat pumpkin painting as a creative seasonal activity rather than a test of artistic ability. Imperfect brushstrokes and slightly uneven patterns often add character, and the finished pumpkin will feel much more memorable because you created it yourself.
Frequently Asked Questions
What is the easiest way to paint a pumpkin?
Clean and dry the pumpkin, then use acrylic craft paint in thin coats. Simple designs such as dots, stripes, faces, or color blocks are easiest for beginners.
What kind of paint is best for pumpkins?
Acrylic craft paint is usually a practical choice because it provides good coverage and comes in many colors. Paint pens are excellent for lettering, outlines, and small details.
Do you need to prime a pumpkin before painting?
Real pumpkins usually do not require primer for simple craft projects. A clean, dry surface and thin paint layers are often enough, although some artificial pumpkins may benefit from a compatible primer.
How do you keep paint from peeling off a pumpkin?
Start with a clean and fully dry pumpkin, avoid overly thick paint layers, and allow each coat to dry properly. Handle the finished pumpkin carefully to reduce rubbing and scratches.
What are good pumpkin painting ideas for kids?
Monster faces, polka dots, fingerprints, animals, rainbows, ghosts, and colorful abstract patterns are all easy choices. Washable paint and mini pumpkins can make the activity more manageable for younger children.